
Most garden beds look better when I limit the plan to 3 colors, 3 texture types, and clear height layers. That’s the core idea.
If I want a bed to look planned instead of crowded, I focus on:
- A tight color scheme: one main color, one support color, and one accent
- Mixed leaf textures: fine, medium, and coarse plants used with purpose
- Plant placement by size: tall in back or center, medium in the middle, low at the edge
- Season spread: early, mid, and late bloom times, plus foliage and winter shape
- Simple upkeep: deadheading, spacing for mature width, and dividing crowded plants every 2–4 years
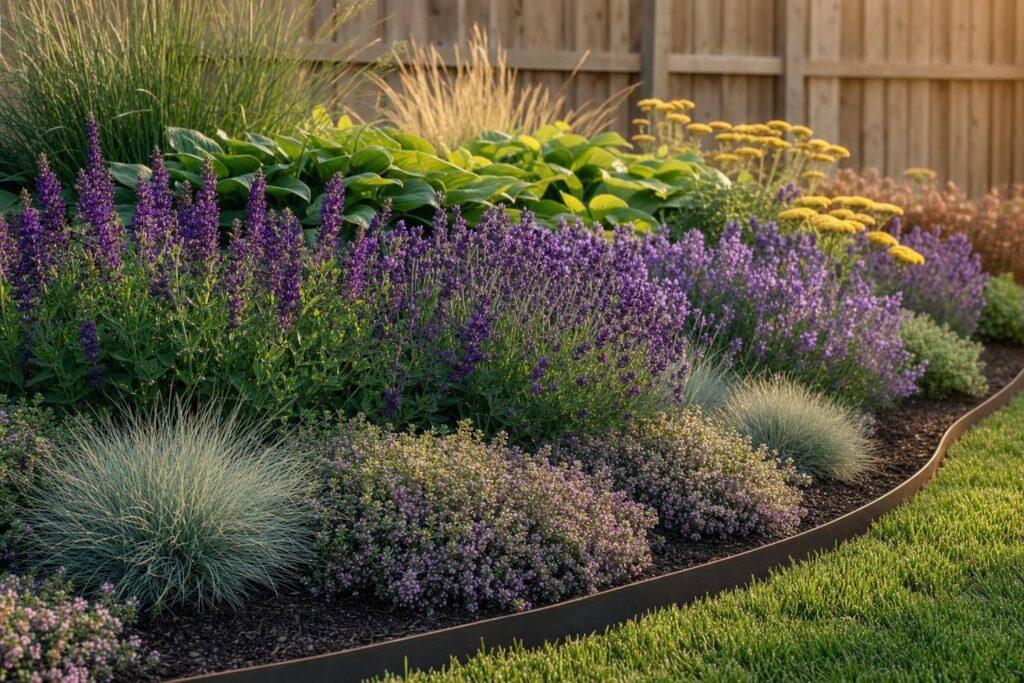
Here’s the short version: flowers may last only a few weeks, but foliage carries the bed for months. That’s why leaf color and leaf size matter so much. I also get a stronger look when I repeat the same color in 2 or 3 spots instead of filling the bed with one-off picks.
A few fast takeaways:
- Warm colors like red, orange, and yellow feel more active
- Cool colors like blue, lavender, and green feel calmer
- Fine textures soften a bed
- Coarse textures pull the eye fast
- Too many bold plants in one area can make the bed feel heavy
If I keep the design simple, layered, and repeated, the whole planting reads better from spring through fall – and still holds its shape when bloom color drops off.
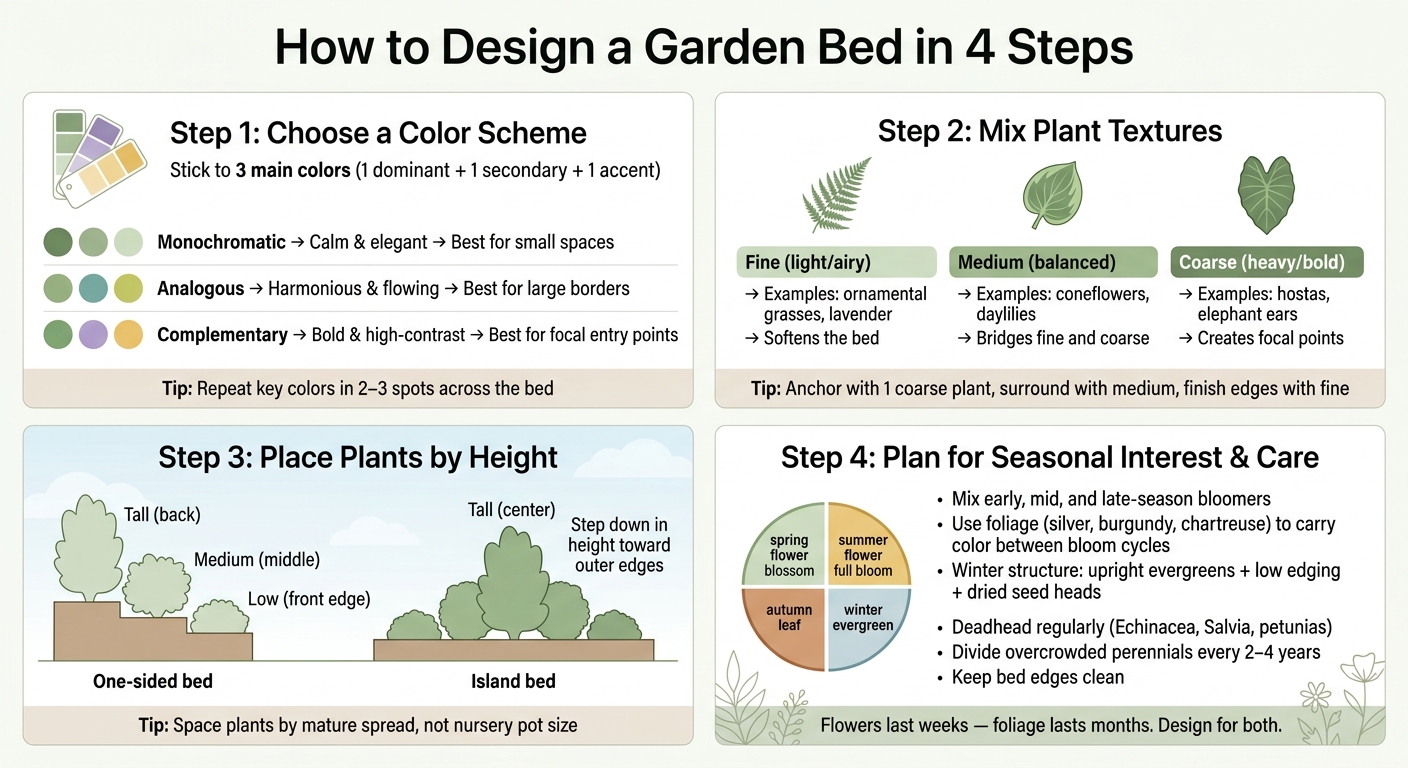
How to Design a Garden Bed: 4-Step Visual Guide
Step 1: Choose a Color Scheme Before Buying Plants
Pick your color scheme before you head to the nursery. It keeps the bed from looking random and helps the whole space feel planned. A good rule is to stick with three main colors. That simple choice gives you a clear base for texture and plant placement in the next steps.
Complementary, Analogous, and Monochromatic Color Groups
There are three main ways to build a garden color palette, and each one sets a different mood. If you choose your approach before buying plants, you’ll save yourself a lot of back-and-forth later.
| Color Scheme | Visual Effect | Difficulty | Best Use Case |
|---|---|---|---|
| Monochromatic | Calm, elegant, and unified | Low | Small spaces or minimalist landscapes |
| Analogous | Harmonious and naturally flowing | Medium | Large borders, cottage gardens, commercial sweeps |
| Complementary | Bold, high-contrast, and energetic | High | Entry plantings and focal points meant to stand out |
After you set the palette, repeat those main colors in both foliage and flowers so the bed feels tied together.
Repeat Key Colors and Include Foliage in the Plan
Instead of filling the bed with one-off plants, repeat the same color in two or three spots across the space. That keeps your eye moving and makes the planting look planned, not pieced together.
Foliage matters just as much as blooms here. Silver Artemisia, burgundy Heuchera, and chartreuse foliage can hold the color plan together through the season. A simple way to build the bed is to start with foliage color first, then layer in flowers. Use:
- One dominant color
- One secondary color
- One accent
sbb-itb-5aa6250
Step 2: Mix Plant Textures for Contrast and Balance
Once you’ve set the color scheme, texture keeps the bed from looking flat. In planting design, texture comes from leaf size, spacing, and plant form – not how a plant feels in your hand.
Think of texture as the layer that gives your color plan shape. It helps organize what the eye sees and keeps your gaze moving across the bed instead of getting stuck in one spot. The easiest way to handle that visual weight is to sort plants into three groups: fine, medium, and coarse.
Fine, Medium, and Coarse Texture Explained
Most plants fit into one of these three texture groups.
Fine-textured plants, like ornamental grasses or lavender, have small, narrow leaves and a loose, airy habit. They read as soft and light in a planting bed.
Coarse-textured plants, like hostas or elephant ears, have large, bold leaves and a much stronger visual presence. They pull attention fast.
Medium-textured plants, such as coneflowers or daylilies, land in the middle. They connect the fine and coarse plants, which helps the whole bed feel more put together.
| Texture | Visual Weight | Design Effect | Common Examples |
|---|---|---|---|
| Fine | Light / Airy | Fades back; adds softness and depth | Ornamental grasses, lavender |
| Medium | Balanced | Bridges fine and coarse; fills volume naturally | Coneflowers, daylilies |
| Coarse | Heavy / Bold | Stands out; creates focal points and structure | Hostas, elephant ears |
When to Repeat Textures and When to Contrast Them
Use each texture group a little differently based on the look you want.
Repeat a texture when you want the bed to feel calm and pulled together. For example, using the same fine-textured grass in a few spots can tie the planting together without making it feel busy.
Contrast textures when you want more depth or a stronger focal point. Feathery ornamental grasses next to broad-leafed hostas make both plants stand out more than they would alone. That kind of pairing gives the bed more life.
Go easy on coarse plants. If you pack too many into one area, the bed can start to feel heavy. A simple way to handle it is this:
- Start with one coarse-textured focal plant to anchor the bed
- Add medium-textured plants around it to connect the layout
- Finish with fine textures near the edges to soften the whole planting
Next, place those textures by height and spread so the bed reads clearly from the front.
Step 3: Place Plants by Height, Spread, and Viewing Angle
Once you’ve settled color and texture, the next job is placement. This is where a plant list starts to feel like an actual garden bed people can read at a glance.
Layer Plants from Front to Back for a Clear View
Think of a garden bed like theater seating. If everything sits at the same level, some plants get lost.
For a one-sided bed, put tall plants in the back, midsize plants in the middle, and low plants along the front edge. Tall focal plants like delphiniums or ornamental grasses hold down the back. Mid-height plants like coneflowers or coreopsis fill the middle. Low, trailing plants like creeping thyme or sweet alyssum finish the front edge.
Use that same idea for island beds, but flip the pattern. Put the tallest plants in the center, then step down in height toward the outer edges so the bed feels balanced from every angle.
Balance Bold Plants with Simpler Surrounding Plants
A bold plant should ground the bed, while simpler plants do the support work. Use medium-height plants to connect the focal plant to everything around it. That way, the design feels tied together instead of random.
Always space plants based on their mature spread, not the size of the nursery pot. A small plant in a garden center can take up much more room once it’s fully grown. Set plants so their mature edges just meet. If young perennials leave gaps at first, fill those spots with annuals until the bed grows in.
After the layout is in place, map out bloom times and seasonal cleanup so the bed stays balanced through the year.
Step 4: Plan for Seasonal Interest and Ongoing Care
Once your layout is in place, the next job is thinking about how the bed will look as the season moves on. A planting bed that looks great in spring but falls flat by midsummer loses a lot of its punch. The goal is to keep color, shape, and texture working from early growth through winter.
Mix Bloom Periods, Foliage Changes, and Lasting Structure
Start with timing, not just flower color. Map out when each plant blooms, then mix early-, mid-, and late-season bloomers so everything doesn’t hit its high point at once and disappear just as fast.
When the flowers fade, the bed still needs something to hold it together. That’s where plant form and foliage do a lot of the heavy lifting. Silver or burgundy leaves can carry the color plan between bloom cycles. For winter, set aside a small part of the bed for structure: upright evergreens in the back, low evergreen edging in the front, and a few perennials left standing for dried seed heads and stems. Those pieces help the bed keep its shape and texture even when growth slows down.
A Basic Maintenance Plan to Protect the Design
Regular deadheading can stretch the bloom period on plants like Echinacea, Salvia, and petunias. It’s a small task, but it helps the bed look cared for instead of tired.
Prune coarse plants before they start crowding nearby plants. If they’re left alone too long, they can throw off the textural balance built into the layout. Pinch back asters in early summer so they stay compact and don’t flop over finer plants around them.
A few simple habits go a long way:
- Keep bed edges clean so the outline stays sharp and the inner textures stand out
- Group plants by water needs to help stop mid-season browning
- Divide overcrowded perennials every 2–4 years so each layer stays clear
The idea is to keep upkeep simple. When maintenance is easy to stick with, the color and texture plan stays readable.
For ongoing upkeep, Dependable Lawn Care offers professional garden bed care services.
Conclusion: Keep the Design Simple, Layered, and Repeatable
A strong garden bed usually comes from repeating a few good choices: a tight color scheme, textures picked on purpose, plants layered by height and viewing angle, and a plan that keeps the bed interesting through the full season. Repeating a small set of colors and leaf shapes often works better than stuffing in more variety. Build the framework, keep up with the care, and the design stays in shape.
FAQs
How do I choose my three colors?
Start with one main color to shape the garden’s mood, like calm blue or bold red. Then pick a second color that works well with it. After that, bring in a neutral or accent shade, such as white, cream, or silver, to keep things balanced.
You can use analogous colors for a smooth, easy look, or complementary colors for more contrast. This simple three-color approach keeps the design pulled together and helps prevent visual clutter.
What plants add texture without overwhelming a bed?
Use fine-textured plants with small leaves or delicate flowers, like ornamental grasses, ferns, alyssum, or baby’s breath. They bring a soft, airy feel that offsets bolder plants such as hostas or large-leaf hydrangeas.
Place these lighter textures in front of, or around, larger plants to add depth and a sense of motion without making the bed feel crowded.
How can I keep a garden bed attractive year-round?
Plan your garden bed so different plants hit their peak at different times. That way, you can keep color in the landscape from late winter through fall instead of getting one short burst and then a long lull.
It also helps to mix in plants that still look good when flowers are gone. Evergreens, berry-producing shrubs, plants with striking bark, and foliage with different colors and textures can keep the garden from looking flat in winter. Even without blooms, they add shape and interest when the rest of the bed is taking a break.
