
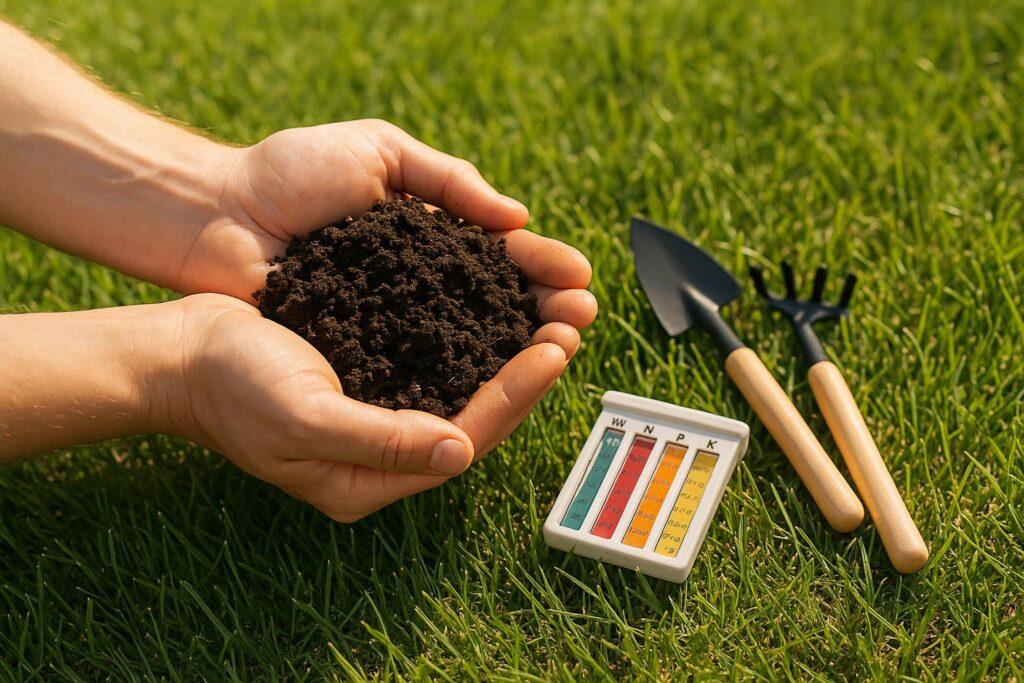
Testing your lawn’s soil is the smartest way to ensure healthy grass growth. It reveals exactly what nutrients your soil lacks, helps you avoid over-fertilizing, and ensures your lawn gets what it needs. Here’s a quick breakdown:
- Why test? To identify nutrient levels, pH balance, and organic matter, ensuring proper fertilization.
- Key nutrients: Nitrogen (growth), Phosphorus (roots), Potassium (resilience).
- Tools needed: Soil probe or trowel, plastic bucket, clean sample bags, gloves.
- Steps: Collect soil samples (3–4 inches deep), mix, dry, label, and send for testing.
- When to test: Every 2–3 years, ideally in fall or early spring.
Soil testing gives you precise insights to create a lawn fertilization plan tailored to your lawn’s needs, saving time and money in the long run.
Why Soil Testing Matters for Your Lawn
Those unsightly brown patches on your lawn might seem like the main problem, but they often point to deeper issues like nutrient imbalances or pH levels that are out of whack. Soil testing helps uncover these hidden problems and provides a roadmap for effective fertilization. One of the most common issues? Nutrient deficiencies. Grass relies on the soil for nutrients to grow, develop strong roots, and fend off diseases. When those nutrients are depleted, your lawn starts to show signs of stress. Without testing, you’re just addressing surface symptoms, not the actual cause.
Another key factor is pH balance. Even if your soil has enough nutrients, an improper pH can prevent your grass from absorbing them. Most lawn grasses thrive in a slightly acidic to neutral pH range of 6.0 to 7.0. When the pH strays from this range, nutrients become locked away, leaving your lawn malnourished despite your fertilization efforts.
Guesswork, or blind fertilization, can waste money and even harm your lawn. Applying nutrients that are already plentiful can lead to over-fertilization, causing excessive growth, thatch buildup, and runoff that harms the environment – all while neglecting the nutrients your lawn actually needs.
Soil testing also measures organic matter, a critical component for healthy soil. Organic matter helps retain moisture and supplies nutrients. Low levels mean you’ll need to water and fertilize more often, while sufficient amounts create a more self-sustaining lawn that requires less upkeep.
By identifying these soil challenges, you can better understand how key nutrients and soil properties influence your lawn’s health. Let’s break down the role of these nutrients and why they matter.
Key Nutrients and Their Impact
A soil test report gives you a clear snapshot of your soil’s nutrient levels, including:
- Nitrogen (N): This is what fuels your lawn’s lush, green growth. Nitrogen is essential but depletes quickly, so it needs regular replenishment. A lack of nitrogen causes pale, slow-growing grass, while too much results in weak, fast growth that’s prone to disease and demands constant mowing.
- Phosphorus (P): Essential for strong root systems, phosphorus is especially important for new lawns or damaged areas. Unlike nitrogen, phosphorus moves slowly through the soil, so deficiencies can linger for years. Without enough phosphorus, grass develops shallow roots, struggles in drought, and loses the battle against weeds.
- Potassium (K): Think of potassium as your lawn’s defense system. It boosts disease resistance, improves drought tolerance, and helps grass endure harsh winters. Lawns low in potassium are more vulnerable to fungal diseases, recover poorly from foot traffic, and struggle with extreme temperatures.
- pH Levels: Even if your soil has the right nutrients, they won’t do much good if the pH is off. A pH below 6.0 limits the availability of nutrients like phosphorus and potassium, while raising the risk of toxic levels of aluminum and manganese. On the flip side, a pH above 7.5 can lock up iron, manganese, and phosphorus, keeping them out of reach for your grass.
All these elements interact in complex ways, influencing every aspect of your lawn’s health. A soil test doesn’t just tell you what’s missing – it reveals how nutrients and pH levels work together in your specific soil conditions. With this information, you can create a tailored fertilization plan that addresses your lawn’s unique needs, steering clear of generic, one-size-fits-all solutions.
Tools and Materials You’ll Need
Getting accurate soil test results starts with having the right tools on hand. The good news? You likely already own most of what you’ll need for reliable soil sampling and testing.
Basic Tools for Soil Sampling
The first step is gathering tools for collecting soil. A soil probe is ideal because it provides consistent core samples at the correct depth. However, if you don’t have one, a garden trowel or spade works just fine for most homeowners. Stick with stainless steel or chrome-plated tools – they’re resistant to corrosion and easy to clean.
Next, grab a clean plastic bucket for mixing soil samples. Plastic is key here since it won’t react chemically with the soil. Steer clear of buckets that have been used for chemicals, fertilizers, or other garden products in the past.
For storing your samples, use clean sample bags or containers – plastic bags or glass jars work well. Make sure you keep soil samples from different areas separate. Disposable gloves are also a must to prevent any oils from your skin from contaminating the soil.
When it comes to testing, you have two main options: at-home soil test kits for basic pH and nutrient information, or professional lab testing for a more detailed breakdown, including micronutrients and organic matter content.
Lastly, gather a few extras: a measuring tape to space out sample points properly, labels to mark containers with the location and date, and a notebook to jot down sample details.
Once you’ve got your tools ready, keeping them clean is the next critical step – let’s explore why.
Why Clean Tools Matter
Clean tools are the foundation of accurate soil testing. Even a tiny amount of residue can throw off your results, which could lead to incorrect fertilization decisions.
"Even a small amount of lime or fertilizer transferred from the sampling tools to the soil can seriously contaminate the sample and produce inaccurate results."
Contamination can come from several sources, like surface dirt or the materials your tools are made from. For instance, tools made of brass, bronze, or galvanized metal can introduce trace elements like zinc or copper, which may hide actual deficiencies in your soil. Similarly, tools previously used for lime, fertilizer, or pesticides can retain microscopic residues, skewing your test results.
To avoid this, wash all tools thoroughly with soap and water before you begin. Pay special attention to crevices where residues might linger, then rinse with clean water and let them air dry. Clean your tools between sampling different areas to prevent cross-contamination.
Another tip: avoid touching the soil with your bare hands – skin oils can alter the results. Use fresh gloves that haven’t been used for other gardening tasks.
Finally, clear away any debris from the sampling area. Even tiny bits of foreign material can affect your test outcomes.
How to Collect Soil Samples
Getting accurate soil samples is the first step in understanding your lawn’s nutrient needs. By following a few simple steps, you can create a reliable foundation for a tailored lawn care plan. The key is to gather representative samples from multiple areas of your lawn and combine them into one composite sample for testing.
Getting Ready to Sample
Timing is everything. Choose a time when the soil is slightly moist – not right after heavy rain or during a drought. If the soil is too wet, it will clump and be difficult to handle, while overly dry soil can make it hard to collect proper core samples.
Before you start, map out your sampling areas. For a typical residential lawn, plan to take 10–15 individual samples from various spots. Focus on areas that represent the general condition of your lawn, especially where you’ll be applying fertilizer. Avoid sampling near driveways, sidewalks, or spots where pets frequently relieve themselves, as these areas can skew your results.
At each sampling location, clear away surface debris like leaves, grass clippings, sticks, or stones. This ensures you’re collecting actual soil, not organic material sitting on top. Once the area is cleared, you’re ready to start digging.
Taking the Samples
Consistency is key when collecting soil samples. Dig to the correct depth – 3 to 4 inches is ideal for lawn testing, as this depth captures the root zone where grass absorbs nutrients. This is also the primary area targeted during lawn aeration to relieve compaction. Some experts suggest going as deep as 6 inches, but for established lawns, the 3–4 inch range provides the most useful information.
Use a soil probe if you have one, or a trowel if you don’t. To collect a sample with a trowel, dig a small hole to the proper depth, then cut a ½-inch vertical slice from the side of the hole. This slice gives you a good cross-section of the soil.
As you collect each sample, remove any stones, roots, insects, or plant material – you want only soil in your bucket. Drop each clean sample into a plastic bucket, and repeat the process at evenly spaced points across your lawn.
Keep your samples uniform in size, aiming for about 2–3 tablespoons of soil per location. If a specific part of your lawn looks very different from the rest – maybe it’s always soggy or unusually dry – consider testing that area separately instead of mixing it into your composite sample.
Once you’ve gathered all your samples, mix them thoroughly in the bucket using a clean tool. Break up any clumps and blend the soil until it looks consistent. This composite sample will represent the overall condition of your lawn.
Drying and Labeling Your Samples
Before testing, your soil sample needs to be dried and labeled. Air-drying is crucial because wet soil can develop mold during storage or shipping, potentially affecting the test results. Spread your mixed soil sample in a thin layer on a clean surface like newspaper, cardboard, or a paper plate.
Place the sample in a warm, dry location away from direct sunlight. A garage, basement, or spare room works well. Avoid using heat sources like ovens or hair dryers, as these can change the soil’s chemical properties. Drying typically takes 24–48 hours. You’ll know it’s ready when the soil crumbles easily and no longer feels damp.
While the sample dries, prepare your labeling information. Most soil testing labs require details like your name, contact information, the date of collection, the area tested (e.g., "front lawn" or "backyard"), and your intended use (lawn/turf). Some labs may also ask for your zip code to tailor fertilizer recommendations to your region.
Once the soil is dry, package it properly for testing. For lab analysis, most facilities need 1–2 cups of dried soil in a clean plastic bag or container. If you’re using an at-home test kit, follow the kit’s instructions for sample size – this is usually just a few tablespoons.
Label everything clearly and include any required paperwork. If you’re testing multiple areas, make sure each sample has a distinct label to avoid mix-ups. Double-check that your contact information is legible – smudged details could delay or prevent you from receiving your results.
With your sample dried, labeled, and packaged, you’re all set to move on to testing and interpreting the results.
How to Read Your Soil Test Results
Your soil test report provides a snapshot of your lawn’s nutrient levels, pH, and organic matter. Decoding these details is the first step toward creating a fertilization plan tailored to your lawn’s needs.
Understanding Your Test Report
Most soil test reports highlight key indicators like soil pH, nutrient levels, and organic matter. The pH level shows whether your soil is acidic or alkaline. For most lawns, a pH range of 6.0 to 7.0 is ideal because it allows nutrients to be absorbed effectively. If your pH is outside this range, adjustments may be necessary.
The report also breaks down the levels of crucial nutrients such as nitrogen, phosphorus, and potassium. Each of these plays a specific role in your lawn’s health – nitrogen promotes growth, phosphorus supports root development, and potassium strengthens resilience. Additionally, organic matter is measured, as it contributes to soil fertility and structure over time. Based on the report, you can determine whether these values fall within a healthy range or if changes are required. These insights will guide your choice of fertilizer to match your lawn’s specific needs.
Choosing the Right Fertilizer
Your soil test results act as a guide for picking the right fertilizer. Fertilizer bags display NPK ratios, which represent the percentages of nitrogen (N), phosphorus (P), and potassium (K). If your lawn is low in a particular nutrient, select a fertilizer with a higher ratio of that nutrient. When deficiencies in multiple nutrients are identified, slow-release fertilizers can be a great option. They provide a steady supply of nutrients over time, helping to avoid sudden spikes that could stress your grass.
Pay attention to the recommended timing for applying fertilizers – spreading nutrients during your lawn’s active growing season can make a noticeable impact. If your test highlights low levels of micronutrients like iron, manganese, or zinc, you might also need specific supplements. Beyond nutrients, your report might uncover other issues that need addressing for optimal lawn health.
Fixing Soil Problems
Sometimes, a soil test uncovers challenges beyond nutrient imbalances, such as pH issues, compaction, or salt buildup. If your soil is too acidic, applying lime can raise the pH, while sulfur-based products can lower it if the soil is too alkaline. Always follow the application instructions on the product label.
For compacted soil or low organic matter, core aeration is a practical solution. Aeration creates pathways for air, water, and nutrients to reach the roots. Following aeration with compost or organic fertilizers can further enhance soil structure and health. If salt buildup is flagged – often caused by over-fertilization or poor drainage – deep watering can help flush excess salts out of the root zone. Adjusting your lawn care practices based on these findings will set you on the path to a healthier, more resilient lawn.
sbb-itb-5aa6250
When and How Often to Test Your Soil
Timing matters when it comes to soil testing. Getting it right not only improves accuracy but also helps you make informed decisions about fertilization. By testing at the right time and frequency, you can stay ahead of potential lawn issues and avoid wasting money on unnecessary treatments.
Best Times to Test
The best times to test your soil are in the fall or early spring. Fall is especially convenient because soil temperatures usually stay above 50°F as the growing season winds down. This allows any soil amendments to break down over the winter, ensuring nutrients are ready for your lawn’s growth come spring.
Fall testing also helps you beat the rush at busy labs. Plus, if your area experiences heavy spring rains, testing in the fall is a smart move since wet, muddy conditions can make collecting quality samples a hassle.
"If you’ve never tested your soil, test it as soon as possible for a baseline reading." – Barbara Shea, Master Gardener at Tertill
No matter when you test, follow the 45-day rule: wait at least 45 days after applying fertilizer to ensure accurate results.
For cool-season lawns, a good time to test is right before applying your winterizer fertilizer, as this often aligns with the 45-day gap after your summer application. For warm-season lawns, testing can be done anytime between late summer and December, as long as the 45-day rule is observed.
Once you’ve nailed down the best timing, focus on how often you should test based on your lawn’s needs.
Testing Frequency
For most lawns, testing every 2–3 years is sufficient. However, factors like soil type and the intensity of your lawn care routine can influence how often you should test. Fertilizer use, organic matter, nutrient absorption, and leaching all affect soil fertility over time.
- Sandy soils lose nutrients quickly, so annual testing is recommended.
- Clay soils hold nutrients longer, so testing every 3–4 years is usually enough.
If your lawn is struggling – whether due to poor growth, stress, or persistent weeds – consider testing annually. Frequent testing can help you pinpoint and address underlying issues, especially if you’re making big changes to your care routine.
Regular soil testing takes the guesswork out of fertilization. It ensures you’re using the right products and helps prevent nutrient runoff that can harm local waterways. By staying on top of your soil’s needs, you can catch problems early – saving you time, money, and effort in the long run.
Professional Lawn Care Support
Once you’ve identified your soil’s needs, turning to professional lawn care services can simplify the journey to achieving a vibrant, healthy lawn. For many homeowners, interpreting soil test results can be tricky – especially when persistent problems or complex fertilization schedules arise. This is where professional expertise comes into play.
Lawn care professionals bring a deeper understanding of soil science. They know how different soil types react to treatments, can pinpoint early signs of nutrient deficiencies, and are skilled at timing fertilizer applications for the best results. If adjusting fertilizers based on soil test results feels overwhelming, these experts can step in with tailored solutions to meet your lawn’s specific needs.
Dependable Lawn Care‘s Services
Dependable Lawn Care has earned its reputation for offering personalized lawn care services that cater to the unique soil conditions of both residential and commercial properties in Oakville and Mississauga.
- The Gold plan provides comprehensive soil management, including customized weed control and fertilization throughout the growing season (April to November).
- The Silver plan focuses on enhanced weekly maintenance, paired with spring cleanup services to prepare the soil for optimal growth.
- The Bronze plan covers essential lawn care practices, such as maintaining proper grass cutting heights and removing debris, which are critical for supporting soil health.
By combining the insights from your soil tests with expert care, professional services can create treatment schedules designed to maximize nutrient absorption. They go beyond basic fertilization, addressing issues like soil compaction, drainage problems, and severe pH imbalances using specialized tools and techniques.
Commercial properties, in particular, benefit greatly from professional soil care. Large lawns often feature varying soil conditions across different areas, requiring customized treatment plans that take into account factors like foot traffic, irrigation coverage, and sunlight exposure.
Investing in professional lawn maintenance often proves more cost-effective in the long run. Instead of purchasing multiple soil testing kits, fertilizers, and equipment, property owners can rely on experts who already have the tools and knowledge to deliver efficient, high-quality results from the start.
Conclusion
Soil testing is the foundation for effective fertilization and long-term lawn health. By following a structured process, you can uncover your lawn’s specific nutrient needs and make informed decisions. These insights pave the way for precise fertilization and, when necessary, professional assistance.
Instead of relying on generic fertilizers, soil testing provides a clear, tailored plan for improvement. Whether your results point to acidic soil needing lime, nitrogen deficiencies requiring specific fertilizers, or compacted soil that benefits from aeration, you’ll know exactly what steps to take. Each part of the process – from collecting samples to reviewing lab results – guides you toward targeted care for your lawn.
For best results, test your soil every 2–3 years, ideally in late fall or early spring, to stay ahead of any changes. If your lawn is new or showing signs of struggle, consider testing annually to address issues more quickly.
While DIY testing offers valuable insights, professional lawn care services bring expertise and advanced tools to the table, delivering efficient and cost-effective solutions. Combining your findings with professional guidance can fast-track your lawn’s transformation into a lush, vibrant space, boosting both its health and your property’s overall appeal.
FAQs
How can I understand my soil test results to create the best fertilization plan for my lawn?
To craft a solid fertilization plan, start by focusing on the key nutrients highlighted in your soil test results: nitrogen (N), phosphorus (P), and potassium (K). Pay close attention to the nutrient levels, which are typically marked as low, medium, or high. For instance, if nitrogen levels are low, your lawn will thrive with a nitrogen-rich fertilizer. On the other hand, high phosphorus or potassium levels often mean you can skip adding more of those nutrients.
Another critical factor to consider is soil pH, as it directly impacts how well your grass can absorb nutrients. If your soil is too acidic (low pH), applying lime can help bring it into balance. Conversely, if the soil is too alkaline (high pH), sulfur might be needed to adjust it. Once you’ve pinpointed any deficiencies or imbalances, select fertilizers or amendments tailored to address those specific needs. This precise approach ensures your lawn stays lush, green, and healthy throughout the year.
What happens if I don’t test my lawn soil before fertilizing?
Skipping a soil test before applying fertilizer can cause more trouble than you might think. Without understanding your soil’s nutrient levels, you could end up overdoing or underdoing it with fertilizer. Too much fertilizer can lead to wasted money, potential damage to the environment through nutrient runoff, and even harm nearby water sources. On the flip side, too little fertilizer can leave you with patchy grass and a lawn that struggles to stay healthy.
By testing your soil, you’ll know exactly what your lawn needs to thrive. This not only saves you time and money but also makes it easier to maintain a lush, vibrant yard.
How do I collect accurate soil samples for testing my lawn?
To get reliable soil test results, it’s essential to use clean, non-metallic tools like a plastic or stainless steel trowel and a clean plastic bucket. Take samples from different areas of your lawn in a zigzag pattern to ensure a well-rounded mix. Aim for 6–8 samples, digging down about 6 inches for each. Combine these in the plastic bucket and mix them thoroughly. Steer clear of metal containers or tools, as they can interfere with the results, and double-check that your bucket is free of any residues. Accurate sampling is key to tailoring your lawn care effectively.
