
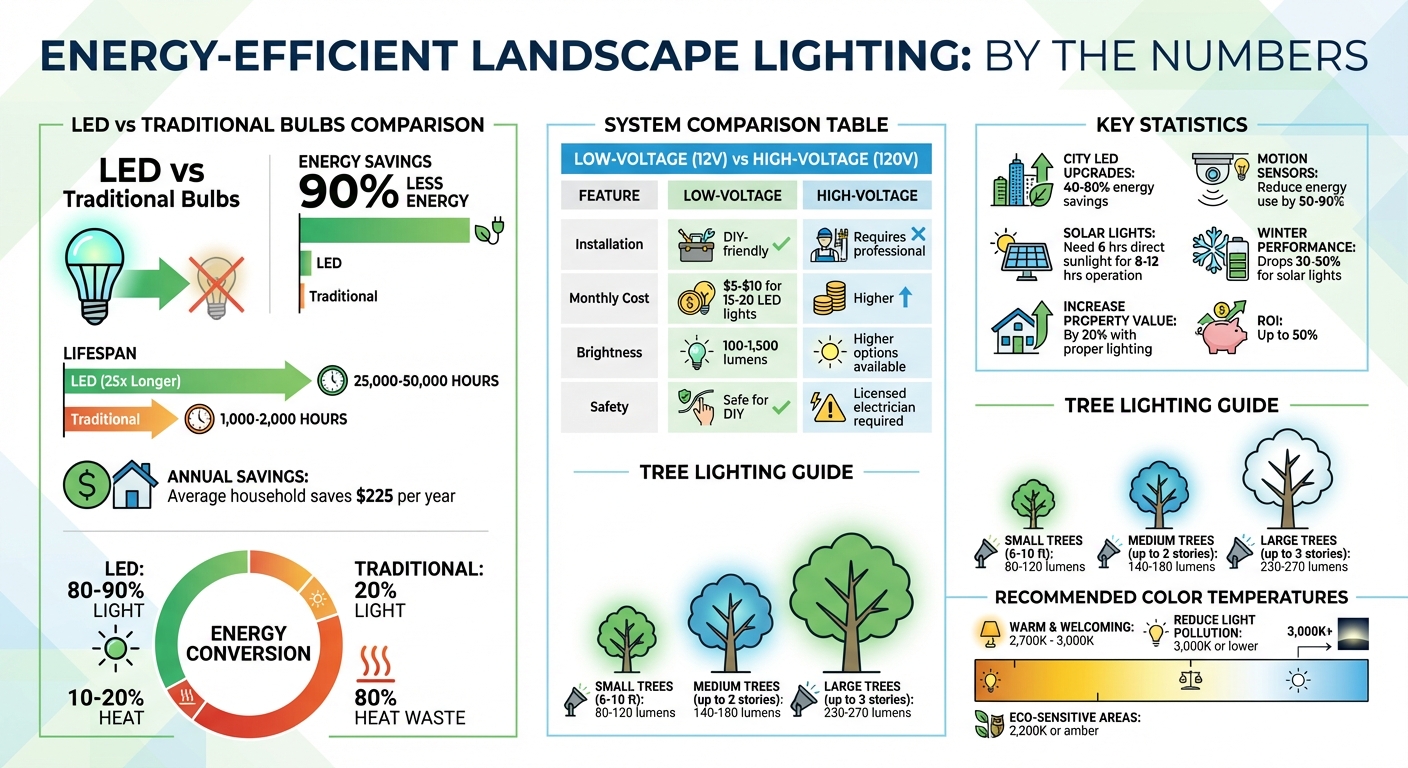
Energy-efficient landscape lighting combines LED technology, solar power, and smart controls to reduce energy use, enhance safety, and improve the appearance of outdoor spaces. LEDs, for example, use up to 90% less energy than traditional incandescent bulbs and last 25 times longer, saving the average household $225 annually. Solar-powered lights eliminate electricity costs entirely, though they perform best with adequate sunlight. Low-voltage systems are safer and more cost-effective for residential use, while motion sensors and timers help minimize energy waste.
Quick tips for success:
- Switch to LEDs: Save energy and reduce replacements.
- Use timers and sensors: Automate lighting to cut waste.
- Opt for low-voltage systems: DIY-friendly and energy-efficient.
- Choose dark-sky compliant fixtures: Reduce light pollution.
- Plan strategically: Highlight key areas without over-lighting.
Whether you’re upgrading a few fixtures or redesigning your setup, these strategies can lower costs, improve safety, and create a polished outdoor look.
LED vs Traditional Lighting: Energy Savings and Cost Comparison
Benefits of Energy-Efficient Landscape Lighting
Lower Carbon Footprint and Reduced Light Pollution
Switching to energy-efficient lighting can lower electricity use by up to 80% compared to traditional incandescent bulbs. This significant reduction in energy demand directly decreases greenhouse gas emissions from power plants. Plus, with a lifespan of 25,000–50,000 hours, these fixtures need fewer replacements, cutting down on manufacturing and disposal impacts.
Light pollution is another issue that energy-efficient lighting addresses. Poorly directed lights create glare, disrupt wildlife, and obscure the night sky. Opting for warm color temperatures of 3,000K or lower reduces blue light emissions, which can confuse nocturnal animals like sea turtles, birds, and insects. Full-cutoff fixtures are another effective solution – they direct light downward, minimizing unwanted spillover into nearby properties or natural areas. Cities that have upgraded to LED systems with smart controls have reported energy savings ranging from 40% to 80%, showcasing the broader community benefits of adopting efficient lighting.
Long-Term Cost Savings
The environmental perks of energy-efficient lighting come with financial benefits, too. While LED fixtures may cost more initially, they pay off over time by significantly lowering utility bills and reducing replacement costs. For example, pairing a 30W LED floodlight with motion sensors and smart timers can slash energy use by up to 80%. Solar-powered fixtures, while entirely eliminating electricity costs for certain areas, may see performance dips of 30% to 50% during winter unless sized appropriately for seasonal changes.
Improved Property Appearance and Value
Efficient lighting doesn’t just save energy – it also enhances the look and feel of your property. Thoughtful landscape lighting adds depth to outdoor spaces, highlighting features that fade into darkness after sunset. LEDs with a high Color Rendering Index (CRI) ensure that the natural hues of plants, stone, and wood are accurately displayed at night. Techniques like silhouetting and shadowing can add striking visual effects, while warm color temperatures in the 2,700K to 3,000K range create a welcoming, upscale atmosphere.
Practical benefits include enhanced safety and security. Illuminated pathways and entryways help prevent accidents and deter intruders, all without the harsh glare of outdated high-wattage floodlights. Shielded fixtures that direct light downward avoid the "washed out" effect, creating a polished and inviting outdoor environment. The result? A property that feels both elegant and secure, all while keeping energy costs low.
sbb-itb-5aa6250
Energy-Efficient Lighting Technologies
LED Lights: Top Choice for Efficiency
LEDs have become the go-to option for landscape lighting, and it’s easy to see why. They convert a whopping 80% to 90% of the electricity they use into light, unlike traditional incandescent bulbs, which waste about 80% of their energy as heat. This efficiency can lead to real savings – an average household could save around $225 annually by making the switch to LEDs. Plus, they last much longer than their older counterparts.
One of the standout features of LEDs is their directional lighting. Unlike incandescent bulbs that scatter light everywhere, LEDs focus illumination exactly where it’s needed. This eliminates the need for external reflectors and reduces wasted light. Their solid-state design, which uses semiconductors instead of fragile filaments, makes them resistant to shocks, vibrations, and tough weather. They also shine in cold climates – literally – where fluorescent lamps often falter.
When choosing LED lights, focus on lumens (brightness) rather than watts (energy consumed). For example, a 100-watt incandescent bulb produces about 1,600 lumens, but an LED can achieve the same brightness with far less power. Look for ENERGY STAR-certified fixtures, which are tested for weather resistance and often include features like automatic daylight shut-off. While LEDs might cost more upfront, falling prices and the long-term savings in energy and replacement costs make them a smart investment.
If you’re looking for an alternative, solar-powered lighting offers another energy-saving option.
Solar-Powered Lighting
Solar-powered lights harness sunlight during the day, storing energy in batteries for nighttime use. These self-contained units don’t require any wiring, making installation as simple as staking them into the ground. Many models come with built-in sensors that automatically turn the lights on at dusk and off at dawn, so there’s no need for manual operation.
The biggest advantage? No ongoing electricity costs. However, solar lights do have their downsides. They typically need at least 6 hours of direct sunlight to provide 8 to 12 hours of light, and in winter, their operating times can drop by 30% to 50% compared to summer. Brightness is another factor – while a solar pathway light might emit 7 lumens, a low-voltage wired light can produce up to 150 lumens. Because of this, solar lights are best suited for marking pathways, highlighting flower beds, or lighting areas where running electrical wiring would be difficult.
Before buying, check if the unit allows for battery replacement. Some models are sealed, meaning the entire light must be discarded if the battery fails. Also, keep the solar panels clean and free of obstructions like bird droppings or tree shadows, as these can significantly reduce charging efficiency and shorten battery life.
For more powerful lighting needs, wired systems offer additional options, but it’s important to understand the differences between low-voltage and high-voltage setups.
Low-Voltage vs. High-Voltage Systems
Low-voltage systems run on 12 volts, using a transformer to step down the standard 120-volt household electricity. This makes them safe and easy for DIY installation since the 12-volt current poses little risk to humans or pets. High-voltage systems, on the other hand, operate at 120 volts and typically require a licensed electrician for installation due to safety concerns.
| Feature | Low-Voltage (12V) | High-Voltage (120V) |
|---|---|---|
| Installation | DIY-friendly; shallow trenching required | Requires professional installation |
| Energy Cost | Around $5–$10/month for 15–20 LED lights | Higher, depending on usage |
| Brightness Range | 100–1,500 lumens | Higher brightness options available |
| Compatibility | Works with solar and battery backups | Direct connection to home wiring |
Low-voltage systems are a popular choice for residential landscape lighting due to their safety and flexibility. They’re also compatible with solar power and battery backups, making them a versatile option. High-voltage systems, while more powerful, are better suited for applications needing intense illumination and come with stricter installation and safety requirements.
Up next, we’ll dive into designing a lighting layout that maximizes efficiency and impact.
Planning Your Landscape Lighting Layout
Evaluating Your Outdoor Space
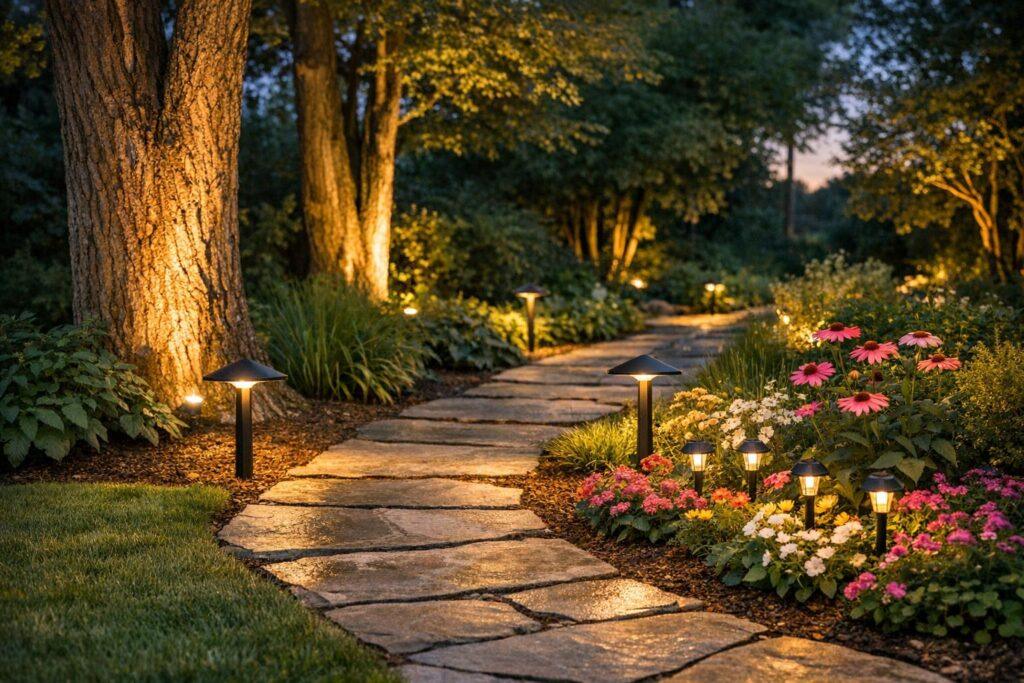
Take a nighttime walk around your property with a flashlight to visualize how lighting could enhance your space. Experiment with effects like uplighting a tree, grazing light across a stone wall, or silhouetting a sculpture. This simple step helps you decide where lighting will make the most impact before you invest in fixtures. Look for focal points – like a majestic oak or a decorative wall – and identify practical areas like pathways, stairs, and entryways that need clear visibility. Don’t overlook security lighting, but remember, you don’t need glaring floodlights. Subtle, well-placed illumination near the house or driveway often works better and saves energy.
"What you don’t light is as important as what you do; let the shadows be part of the design." – David K. Warfel, Lighting Designer
Before finalizing your layout, locate GFCI-protected outdoor outlets and decide where to position your transformer. It should be at least 30 feet away from water features for safety. If your system requires trenching, call 811 (the national "Call Before You Dig" service) to mark underground utilities, sprinkler systems, and cables. This precaution helps you avoid costly mistakes and ensures a safe installation.
Once your space is evaluated, you’re ready to choose the right fixtures for your design.
Selecting the Right Fixtures
Choosing the right fixtures makes all the difference. For walkways, shielded path lights provide safe, focused illumination. Spotlights (with a narrow beam spread of about 45°) are perfect for highlighting specific features like a tree or architectural detail. Floodlights, on the other hand, offer wider coverage (up to 120°) and work well for driveways or large open spaces. In-grade well lights, which sit flush with the ground, are ideal for uplighting trees or structures without visible fixtures. If placing these near walkways or driveways, ensure they’re rated for drive-over use.
The materials you choose for fixtures also matter. Cast brass or machined aluminum fixtures resist corrosion and maintain their quality over time, especially in areas with salty air. Stamped steel may cost less initially, but it tends to degrade faster, reducing light output and wasting energy. For tree lighting, match the lumen output to the tree’s size: small trees (6–10 feet) need 80–120 lumens, medium trees (up to two stories) require 140–180 lumens, and large trees (up to three stories) need 230–270 lumens.
To avoid costly mistakes, consider starting with a small mockup of your design. For example, set up six accent lights and six path lights to test placement and effects. This approach lets you make adjustments based on real-life results before committing to a full installation.
Positioning Lights for Maximum Efficiency
For path lighting, place fixtures about 14 inches high and within 1 foot of the walkway’s edge. Space them so the light from each fixture just overlaps the next – about 20 feet apart is a good guideline. This avoids the “runway effect,” where continuous lighting looks unnatural and wastes energy. Stagger lights on both sides of a driveway for a more balanced, natural appearance instead of lining them up in parallel rows.
To minimize wasted light, apply the beam width formula: Angle × 0.018 × Distance = Beam Width. This ensures your lights are focused where they’re needed. For textured surfaces like stone walls, place lights close to the surface and aim them upward or across. This “grazing” technique creates depth and drama without requiring high wattage. Another effective method is moon lighting, where shielded fixtures are placed high in trees, shining downward to mimic soft moonlight filtering through branches.
"The goal of landscape lighting is to only see the effect of the light, not the light source itself." – Lumens Admin
When installing low-voltage systems, dig trenches 6 inches deep and 6 to 12 inches back from pathway edges to protect cables from damage. For security lighting, pair photosensors with motion sensors so lights only activate when needed – this saves energy without compromising safety. To maintain consistent brightness, keep cable runs under 50 feet, or use a hub system where a main cable branches out to fixtures with equal-length connections.
Using Controls to Reduce Energy Use
Incorporating controls into your landscape lighting system can cut down on energy waste without sacrificing functionality. By using a mix of timers, sensors, and smart technology, you ensure your lights operate only when necessary, saving money and minimizing energy consumption.
Timers and Automated Schedules
Timers tackle one of the biggest culprits of energy waste: lights left on when they aren’t needed. You can program your lights to switch on at dusk and turn off at a specific time, like midnight or whenever you typically head to bed.
"Timers and Photocells allow for preset hours of illumination or auto-on during low daylight hours." – Top Notch Landscape Lighting
Photocells, or light sensors, take things a step further by adapting to seasonal changes in sunrise and sunset times. These sensors detect ambient light and automatically activate your system only when it’s genuinely dark outside. This "dusk-to-dawn" feature is particularly useful for security lighting near entryways or driveways. When selecting timers or dimmers, make sure they’re compatible with LED bulbs to avoid issues like flickering or damage to your hardware.
Now, let’s look at how motion and light sensors can further refine your energy-saving efforts.
Motion and Light Sensors
Motion sensors ensure lights stay off until they’re actually needed, cutting energy use by 50% to 90% in areas that aren’t constantly in use. For security purposes, combining a motion detector with a photosensor ensures lights activate only when it’s dark and movement is detected. This approach provides safety without the unnecessary cost of keeping floodlights on all night.
"Outdoor lighting must be controlled separately from indoor lighting. Outdoor lights must be turned off during the daytime using a photo sensor or automatic timer." – Garrett Rock, Lighting Design Consultant, Alcon Lighting
With the average U.S. homeowner spending over $200 annually on outdoor lighting, motion sensors can significantly reduce these costs. For areas like pathways and stairs, motion-activated lights provide instant illumination to prevent accidents, then turn off automatically after a set period. To keep these sensors functioning properly, regularly clean their lenses – dirt or debris can cause false triggers or missed activations.
Smart Lighting Systems
Smart lighting systems take timed and sensor-based controls to the next level, offering advanced automation and remote management. With smart controllers, you can adjust schedules on the fly through smartphone apps or voice commands, whether it’s to accommodate changing weather, special occasions, or seasonal shifts. Features like geofencing even allow your driveway lights to turn on as you approach and switch off after you leave.
"Motion sensors, dimming capabilities, and geofencing create personalized, efficient lighting. Imagine lights that automatically turn on as you approach your driveway." – Stephen Deo, Author, NatureScape Lighting + Audio
Smart systems also integrate seamlessly with broader home automation setups, letting you sync outdoor lighting with indoor routines. Dimming features add an extra layer of energy efficiency, allowing you to lower light levels for ambiance while cutting electricity use. When upgrading to smart technology, double-check that your transformer and fixtures are compatible with the required voltage and designed for outdoor use, complete with proper weatherproofing.
Installation and Maintenance Guidelines
Ensuring your lighting system is installed correctly and well-maintained is key to keeping it energy-efficient and cost-effective for years to come. Whether you’re taking on the project yourself or hiring a professional, following proper procedures and staying on top of maintenance can help you avoid expensive repairs and keep everything running smoothly.
Safe Installation Methods
Before you start digging, always call 811 to check for underground utilities. For DIY enthusiasts, low-voltage systems (12 volts) are typically safe to handle. However, systems running at 120 volts or higher should always be installed by a licensed electrician who adheres to National Electrical Code standards.
When setting up your transformer, mount it 12 inches above the ground near a GFCI-protected outlet, ensuring it’s at least 1 foot away from any structure and 30 feet from water sources. For wiring, use 12-gauge cable for most residential applications, and opt for 10-gauge cable for the main line from the transformer to reduce voltage drop. Always bury cables securely to protect them from accidental damage during gardening or lawn care.
"If you accidentally cut a 12-volt line, for example, while shoveling, the current won’t injure you. However, it will still shock you." – Heath Eastman, Master Electrician
To ensure waterproof connections, use brass barrel connectors with heat-shrink tubing or silicone-filled wire nuts. Test all connections before filling trenches to identify any issues with fixtures or wiring. Additionally, avoid overloading your transformer by keeping the total wattage of connected lights at least 20% below its rated capacity.
Once your system is installed, regular maintenance will help it perform at its best.
Regular Maintenance Tasks
Routine care is essential to maintain efficiency and prevent unnecessary wear on your system. Start by cleaning the lenses and shades of your fixtures to remove dirt and debris that can block light and force the system to work harder. Inspect wire connectors and terminal screws every few months to prevent issues like electrical resistance or voltage drops. For ground-level fixtures, such as well lights, check that gaskets and watertight seals (rated IP67) remain intact to protect against water damage and corrosion.
Keep plants trimmed away from fixtures to avoid blocking light or causing physical damage to the housing or wiring. Make sure all wires stay buried to protect them from lawn equipment or foot traffic. A low-voltage system with 15 to 20 LED lights running six hours a night typically costs only $5 to $10 per month in electricity. However, neglecting maintenance can lead to inefficiencies that drive up costs.
Regular upkeep also ensures your system adapts to seasonal changes without a hitch.
Adjusting for Different Seasons
As the seasons change, so do the demands on your lighting system. Adjust timers or smart controls to match shifting sunrise and sunset times. Solar lights need at least 6 hours of direct sunlight, so reposition them during winter months to maximize exposure.
Cold weather and long wiring runs can affect performance, so keep an eye on voltage drop and aim to keep it under 5%. In spring and summer, as plants grow, you may need to reposition or raise garden lights to ensure they remain above the foliage they’re meant to highlight. During winter, place fixtures where they won’t be damaged by snowplows or shovels, and use "while-in-use" weatherproof covers to protect transformer connections from rain and snow.
Minimizing Light Pollution
Choosing energy-efficient lighting doesn’t just save money – it helps preserve the beauty of the night sky. Light pollution happens when excess light spills upward, creating a skyglow that obscures the stars and disrupts wildlife. Thoughtfully designed fixtures can reduce this problem while still enhancing your outdoor spaces.
Dark-Sky Compliant Fixtures
The first step in cutting down light pollution is selecting the right fixtures. Dark-sky compliant lighting focuses light where it’s needed – downward – rather than letting it escape into the sky. These fixtures are designed with full shielding, meaning the bulb is recessed to prevent light from shining above the horizontal line. This not only minimizes skyglow but also eliminates harsh glare at eye level.
"A fully shielded or full cut-off fixture emits light downward onto the task area and not into the sky." – National Park Service
Look for fixtures certified by DarkSky International. Avoid designs like globes or diffusers that scatter light upward. Pay attention to color temperature as well – warmer tones (2,700K or lower) reduce blue-violet light, a major contributor to skyglow and glare. For areas that are sensitive to ecological impacts, consider 2,200K or amber lighting to minimize disruption even further. These fixtures strike a balance between efficiency and environmental responsibility by targeting light exactly where it’s needed.
Balancing Aesthetics with Environmental Protection
You don’t need to flood your yard with light to create an inviting atmosphere. Instead, focus on highlighting specific features, like a tree, a pathway, or an architectural detail, while keeping the surrounding areas dim.
"You want pools of light to guide your eye from one plant to the next, not continuous illumination." – Mark Piantedosi, Owner, Commonwealth Landscape Lighting
Follow these five principles for effective outdoor lighting: keep it useful, targeted, low-level, controlled, and warm-colored. Make sure your lighting serves a clear purpose, is directed downward with proper shielding, isn’t overly bright, operates only when necessary, and minimizes blue light. For instance, try moonlighting, where a light is placed high in a tree and aimed downward to create a soft, natural glow. This technique reduces light pollution while maintaining a beautiful ambiance.
To take it a step further, pair these strategies with smart controls like timers, motion sensors, and photosensors. These tools ensure your lights are only on when needed, reducing energy use and environmental impact while still delivering the aesthetic appeal you’re after. This approach works hand-in-hand with the energy-saving tips mentioned earlier.
Conclusion
Energy-efficient landscape lighting offers more than just a way to brighten up your outdoor spaces – it combines style, security, and smart energy use. LED technology leads the pack, using 70% to 80% less energy than traditional bulbs while lasting up to 60 times longer. Pairing LEDs with low-voltage systems and smart controls like timers or motion sensors creates a winning combination for energy savings and convenience.
But the advantages go beyond a lower electric bill. Well-designed outdoor lighting can increase property value by as much as 20% and deliver a return on investment of up to 50%. Whether it’s uplighting to highlight architectural features, casting soft moonlight effects through trees, or illuminating pathways for safe navigation, thoughtful lighting design enhances both the security and the overall charm of your home.
"Energy efficient lighting is a must for eco-conscious homeowners. Now that the options for LED lamping mimic the warm, inviting glow of incandescents, we no longer have to choose between beautiful light and energy efficiency." – Heather Garrett, Interior Designer
To create a stunning yet practical lighting setup, focus on highlighting key features without overwhelming the space. Use dark-sky compliant fixtures with proper shielding, stick to warm color temperatures (2,700K or lower), and position lights intentionally to serve a specific purpose. The goal is to showcase the effect of the lighting – not the fixtures themselves. These principles tie together the strategies outlined in this guide.
For the best results, professional help can make all the difference. Dependable Lawn Care specializes in yard design and landscaping services in Oakville and Mississauga. From planning layouts to selecting the right transformers and fixtures, they ensure your lighting system performs beautifully and stands the test of time.
FAQs
What should I consider when choosing energy-efficient landscape lighting fixtures?
When selecting energy-efficient landscape lighting, start by determining your priorities – whether you’re aiming to boost safety, showcase specific features, or create a cozy ambiance. Choosing low-voltage LED fixtures is a smart move since they consume far less energy than traditional incandescent or halogen options while still delivering plenty of brightness. If you have areas that get ample sunlight, consider solar-powered LED lights as an eco-friendly alternative.
Match your fixtures to their intended use: path lights for walkways, spotlights to highlight features, floodlights for broader coverage, and well lights for uplighting trees. Make sure the fixtures are rated for outdoor use and have weatherproofing (like an IP65 rating) to withstand rain and dust. Incorporating smart controls, such as timers or motion sensors, can further cut down on energy consumption and keep your lighting system efficient. Need professional advice? Dependable Lawn Care can help design and install a system tailored to your yard and energy-saving needs.
What are the advantages of using smart controls for outdoor lighting?
Smart controls bring a host of advantages to outdoor lighting systems. With these, you can schedule and adjust lighting remotely, cutting down on energy use and minimizing unnecessary waste. They also boost security with motion-activated lights and let you tailor the lighting to fit any mood or event through customizable settings.
Incorporating smart controls into your outdoor lighting setup adds convenience, efficiency, and adaptability, offering a modern way to manage energy-conscious outdoor spaces.
How can I reduce light pollution while improving my outdoor lighting?
Reducing light pollution while improving your outdoor lighting boils down to thoughtful planning and smart decisions. Light pollution takes several forms: sky glow (light scattering upwards), light trespass (spilling into areas it doesn’t belong, like a neighbor’s yard), and glare (brightness so intense it hampers visibility). Tackling these issues can help you design an inviting outdoor space that’s energy-efficient and kinder to the environment.
Here are some practical ways to achieve this:
- Use fully shielded, downward-facing fixtures to ensure light is directed where it’s needed, rather than upward or outward.
- Stick to warm LEDs (3,000 K or lower) to reduce the harsh blue light that contributes to sky glow.
- Adjust brightness to fit the task – for example, pathways typically only require 5–10 lumens per square foot.
- Incorporate controls like timers, dimmers, or motion sensors so lights are only on when necessary.
- Position lights strategically to avoid reflecting off surfaces like walls or fences, which can disturb neighbors.
Integrating these techniques into your landscape design – like highlighting a garden path or patio – can create a beautifully lit yard that’s safe, welcoming, and considerate of the night sky. If you’re looking for expert guidance, Dependable Lawn Care offers customized lighting and landscaping solutions to bring your vision to life.
